S小魚仔S 網誌搜尋

2018年7月25日 星期三

S小魚仔S Centos 7 搭建 Ansible awx 套件 提供 UI 介面操作

Ansible Awx (免費) 提供可視化操作介面,開始進行佈署「Ansible Awx」。

#==修改「電腦」名稱 ( SVN )====
hostnamectl set-hostname ansible_awx

#==關閉「selinux 」======
#關閉「Selinux」為「disabled」才不會阻擋「服務連線」服務
sed -i 's/SELINUX=enforcing/SELINUX=disabled/' /etc/selinux/config

#==設定 Firewall========

#加入「防火牆」規則 Web UI
sudo firewall-cmd --add-port=80/tcp --permanent

#重新啟動「防火牆」
sudo firewall-cmd --reload


#==更新「Yum」源
yum install -y epel-release

#安裝「postgresq.rpm」更新「yum」源
yum install -y https://download.postgresql.org/pub/repos/yum/9.6/redhat/rhel-7-x86_64/pgdg-centos96-9.6-3.noarch.rpm

#安裝「postgresql」
yum install postgresql96-server -y

#安裝「rabbitmq-server」、「wget」、「memcached」、「nginx」、「ansible」
yum install -y rabbitmq-server wget memcached nginx ansible

#下載「mrmeee-awx-epel-7.repo」套件
wget -O /etc/yum.repos.d/awx-rpm.repo https://copr.fedorainfracloud.org/coprs/mrmeee/awx/repo/epel-7/mrmeee-awx-epel-7.repo

#安裝「awx」
yum install -y awx

#初始化「postgresql」資料庫
/usr/pgsql-9.6/bin/postgresql96-setup initdb

#启动rabbitmq服务
systemctl enable rabbitmq-server
systemctl start rabbitmq-server

#启动Mpostgresql服务
systemctl enable postgresql-9.6
systemctl start postgresql-9.6

#启动Memcached服务
systemctl enable memcached
systemctl start memcached

#创建Postgres用户
sudo -u postgres createuser -S awx

#创建Postgres 数据库
sudo -u postgres createdb -O awx awx

#将数据导入数据库
sudo -u awx /opt/awx/bin/awx-manage migrate

#===初始化 Ansible AWX ====
echo "from django.contrib.auth.models import User; User.objects.create_superuser('admin', 'root@localhost', 'password')" | sudo -u awx /opt/awx/bin/awx-manage shell

sudo -u awx /opt/awx/bin/awx-manage create_preload_data

sudo -u awx /opt/awx/bin/awx-manage provision_instance --hostname=$(hostname)

sudo -u awx /opt/awx/bin/awx-manage register_queue --queuename=tower --hostnames=$(hostname)


#===配置Nginx===

#備份來源「nginx.conf」
cp /etc/nginx/nginx.conf /etc/nginx/nginx.conf.bkp

#替换nginx conf文件
wget -O /etc/nginx/nginx.conf https://raw.githubusercontent.com/sunilsankar/awx-build/master/nginx.conf

#啟動「Nginx」
systemctl start nginx
systemctl enable nginx


#==========啟動「Awx」相關「程序」
systemctl start awx-cbreceiver
systemctl start awx-celery-beat
systemctl start awx-celery-worker
systemctl start awx-channels-worker
systemctl start awx-daphne
systemctl start awx-web

#=========開機自動啟動「Awx」相關「程序」
systemctl enable awx-cbreceiver
systemctl enable awx-celery-beat
systemctl enable awx-celery-worker
systemctl enable awx-channels-worker
systemctl enable awx-daphne
systemctl enable awx-web

#====需要「Reboot」重開機====
reboot -h now


接下來輸入「http://ip」 ( User: admin Password: password )


Ansible Awx 安裝完成


#===Ansible AWX 有 Bug 必須使用以下指令修復 ( 2019/09/25 ) 更新 ===
PS. 如果不修復任務會一直處於「pending」狀態 

sudo -u awx scl enable rh-python36 rh-postgresql10 "awx-manage create_preload_data"
sudo -u awx scl enable rh-python36 rh-postgresql10 "awx-manage provision_instance --hostname=$(hostname)"
sudo -u awx scl enable rh-python36 rh-postgresql10 "awx-manage register_queue --queuename=tower --hostnames=$(hostname)"
  
systemctl restart awx-cbreceiver
systemctl restart awx-dispatcher
systemctl restart awx-channels-worker
systemctl restart awx-daphne
systemctl restart awx-web

參考資料

2018年7月17日 星期二

S小魚仔S ELK 5.6.8 支持 sentinl 告警服務 ( E-mail、Wechat....等)

在「Github」發現「sentinl」套件 並支持「Elasticsearch」、「Logstash」、「Kibana」5.6.8 版本,「sentinl」依賴於「kibana」角色並安裝「plugin」。
PS. 「sentinl」與「elk」版本必須對應否則安裝起來會無法使用。

如何安裝「sentinl」?

切換至 kibana 內 bin 資料夾
 cd /opt/kibana-5.6.8-linux-x86_64/bin

執行「安裝」plugin  (在線安裝)
./kibana-plugin install https://github.com/sirensolutions/sentinl/releases/download/prerelease/sentinl-v5.6.8.zip

離線安裝方式
/opt/kibana-5.6.8-linux-x86_64/bin/kibana-plugin install file:/opt/sentinl-v5.6.8.zip

安裝完成會顯示如下畫面

編輯「kibana.yml」(加入最後面即可)


                     #====設定「sentinl plugin」===
                      sentinl:
                         es:
                         host: localhost                      # elasticsearch server
                         port: 9200                             # elasticsearch port
                      settings:
                         email:
                              active: true
                              user: "456839"                  #使用「QQ」帳號
                              password: "scdiosdcm3"  #使用「QQ」密碼
                              host: smtp.qq.com           #設定「QQ」smtp
                              ssl: true                             #使用「SSL」加密
                              timeout: 100000                #mail server  timeout

接著重啟「kibana」

netstat -ltunp | grep "5601"

kill -9 3409

/opt/kibana-5.6.8-linux-x86_64/bin/kibana &

登入「kibana Web UI」

接下來就是 Sentinl Web Ui 相關設置 和 告警服務

建立新的「Watchers」(觀察者)

點選「Watcher」

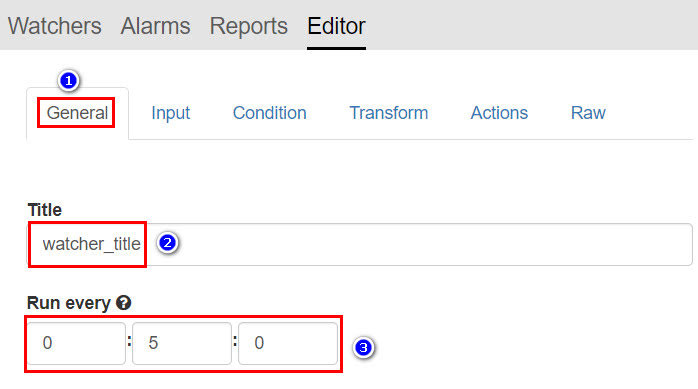
1. 點選「General」建立「標題」和「循環執行時間」

這裡就是最關鍵也是最困難,初學者一定看不懂這是什麼意思,簡單的話就是把 需要查詢 ES 條件語句 ( JSON ) 寫入進去,這個預設語句是查詢所有筆數。

多少筆數發生告警

 在「Action」建立「email」

輸入「E-mail」相關資訊

點選「SAVE」這個很重要..不然之前做的設定會清空

點選「三角形」圖案 進行單次循環測試

 出現「Executed watcher」表示成功

檢查「信箱」確認 Sentinl Alarm 內容

相關參考資料
「seeker的博客」-「Sentinl插件安装及使用」
「Truman's Blog」-「Sentinl-(Kibana Alert & Report App for Elasticsearch)」
「玖分博客」-「elk告警插件sentinl安装使用」
「ELK 6.2.3」-「Kibana 插件 sentinl 使用教程」
「ELK + Sentinl 日志实时监控报警 钉钉、邮件」-「ELK + Sentinl 日志实时监控报警 钉钉、邮件」

2018年7月10日 星期二

S小魚仔S Ansible Roles 簡易攻略

Ansible 提供 Roles 寫法 平常很少使用,作筆記避免忘記
什麼是「Ansible」Roels ?
Roles 是 Ansible自1.2版本引入的新特性,用於層次性,結構化地組織 Playbook 簡單來說就是讓程式井然有序。

我們先來看一下 「Roles」基本 資料夾 結構


metricbeat.yml (呼叫程序)

「tasks」 folder ( main.yml ) 執行程序

「templates」 folder ( metricbeat_cfg.j2 ) 存放設定檔

「vars」 folder ( main.yml ) 存放變數
# 如何呼叫 ansible 變數  => {{kafka_version}}

2018年5月23日 星期三

S小魚仔S Centos 7 搭建 Ansible 自動化運維 簡易手冊

簡單的自動化IT工具。Ansible基於Python開發,集合了眾多運維工具(puppet、cfengine、chef、func、fabric)的優點,實現了批量系統配置、批量程序部署、批量運行命令等功能。

Ansible只需要在一台普通的服務器上運行即可,不需要在被管控的服務器上安裝客戶端。因為它是基於SSH的,Linux服務器離不開SSH,所以Ansible不需要為配置工作添加額外的支持包含客戶端 (Agent) 。

Ansible在管理節點將Ansible模塊通過 SSH 協議(或者 Kerberos、LDAP)推送到被管理端執行,執行完之後自動刪除。

#==修改「電腦」名稱 ( ansible )====
hostnamectl set-hostname ansible

#==關閉「selinux 」======
#關閉「Selinux」為「disabled」才不會阻擋「服務連線」服務
sed -i 's/SELINUX=enforcing/SELINUX=disabled/' /etc/selinux/config

#====需要「Reboot」重開機====
reboot -h now

#=安裝「epel-release」yum 源
sudo yum install epel-release -y

#=安裝「ansible」
sudo yum install ansible -y


一. 「Ansible」 加入「監控主機」

#配置「hosts」文檔

vi /etc/ansible/hosts

#「servers」=「group」(群組),ansible 可以指定「群組」或「單一節點」主機

[servers]
192.168.8.50 ansible_ssh_user=test ansible_ssh_pass=test ansible_ssh_port=22
192.168.8.51 ansible_ssh_user=test ansible_ssh_pass=test ansible_ssh_port=22

#設定 「Ansible」配置文檔 ( 關閉 SSH KEY 驗證 )

vi /etc/ansible/ansible.cfg

[defaults]

host_key_checking = false

二.「Ansible」(Ad-Hoc command) 簡易「指令」

#修改「單節點」主機「名稱」
ansible 192.168.8.50 -m hostname -a "name=python"

#修改「單節點」主機「端口」服務
ansible 192.168.8.51 -m command -a 'netstat -ltunp'

#修改「單節點」主機「網卡」
ansible 192.168.8.51 -m command -a 'ifconfig'

#修改「單節點」關閉「selinux」
ansible 192.168.8.51 -m selinux -a 'state=disabled'

#修改「單節點」重啟「主機」
ansible 192.168.8.51 -m command -a 'reboot -h now'

#測試「Ping」群組「servers」節點主機
ansible servers -m ping

#複製 來「源」到 目「的」檔案 並 賦予「權限」
ansible servers -m copy -a "src=/etc/ansible/ansible.cfg dest=/tmp/ansible.cfg owner=root group=root mode=0644"

#下載「URL」(HTTP) 檔案
ansible servers -m get_url -a 'url=http://releases.ansible.com/ansible/ansible-1.1.tar.gz dest=/opt/'

三.「Ansible」派送「Shell」腳本

#給予「腳本」執行「權限」
chmod +x /opt/ansible_test.sh

#複製 來「源」到 目「的」腳本 並 賦予「權限」
ansible servers -m copy -a "src=/opt/ansible_test.sh dest=/opt/ owner=root group=root mode=0755"

#指定「群組」執行「ansible_test.sh」檔案
ansible servers -m shell -a "/opt/ansible_test.sh"

四.「Ansible」派送「*.yml」腳本

Ansible 使用 Playbook 進行「yml」派送,Playbooks 有五個組成結構。

Variables - 變量元素,可傳遞給Tasks/Templates使用
Tasks - 任務元素,即調用模塊完成任務
Templates - 模板元素,可根據變量動態生成配置文件
Hadlers - 處理器元素,通常指在某事件滿足時觸發的操作
Roles - 角色元素


==相關範例如下==

#建立「yml」描述檔
vi /opt/test.yml


- hosts: 192.168.8.51
  #==執行「任務」
tasks:
    #===Yum「java」安裝
  - name:  yum install java
yum:
             name: java
             state: latest
    

#執行「test.yml」檔案
ansible-playbook /opt/test.yml

參考資料
「运维那点事 运维开发 DBA 分享平台」-「Ansible第一篇:介绍及安装」
「官方網站」-「http://docs.ansible.com/」
「http://docs.ansible.com」-「Windows Support」
「运维那点事 运维开发DBA分享平台」-「Ansible第四篇:Playbook基础」

2018年5月3日 星期四

S小魚仔S Centos 7 搭建 Frp Reverse Proxy (反向代理服務器) 實現 內網穿透

什麼是「FRP」?  當您的網路環境沒有「公網地址」(Public IP) 搭建「FRP」可以實現「公網穿透內網」原理相當於「反向代理服務器」,可以達成「TCP、UDP、HTTP、HTTPS」轉發,詳細原理請參考該作者「https://github.com/fatedier/frp」,可以搭建在「Windows」和「Linux」主機。

要實現這一目標,先得有一個具備公網 IP 的 VPS ( vultr 、virmach、Bandwagonhost ) 或 主機,雖說還是離不開公網IP,但在大陸這總比找寬帶運營商要個公網IP簡單多了。


使用版本「frp_0.17.0_linux_amd64.tar.gz」內含 ( frps 和 frpc )

簡單步驟原理講解

1. Domain (一級域名) 供應商「指向」frps 公網 IP (完成域名解析)
PS. DDNS 動態域名沒測試過

2. 配置「frps」服務器端

=== frps ( Server ) ===

#修改「電腦」名稱
hostnamectl set-hostname Frps

#加入「防火牆」規則  - Frp Server
sudo firewall-cmd --add-port=7000/tcp --permanent

#加入「防火牆」規則  - Https
sudo firewall-cmd --add-port=443/tcp --permanent

#加入「防火牆」規則  - Http
sudo firewall-cmd --add-port=80/tcp --permanent

#重新啟動「防火牆」
sudo firewall-cmd --reload

#關閉「selinux」
sed -i 's/SELINUX=enforcing/SELINUX=disabled/' /etc/selinux/config

#需要「Reboot」重開機
reboot -h now

#切換「/opt」目錄
cd /opt

#下載「frp_0.17.0_linux_amd64.tar.gz」
wget https://github.com/fatedier/frp/releases/download/v0.17.0/frp_0.17.0_linux_amd64.tar.gz

#解壓縮「frp_0.17.0_linux_amd64.tar.gz」
tar -zxvf frp_0.17.0_linux_amd64.tar.gz

#切換「frp_0.17.0_linux_amd64」目錄
cd /opt/frp_0.17.0_linux_amd64

#刪除「客戶端」文件
rm -f frpc frpc_full.ini frpc.ini

#編輯「服務器端」檔案 ( frps.ini )
vi /opt/frp_0.17.0_linux_amd64/frps.ini


[common]
bind_port = 7000 #啟用「監聽端口」
vhost_http_port = 80 #啟用「監聽端口」
vhost_https_port = 443 #啟用「監聽端口」
privilege_mode = true # 傳輸「加密」
privilege_token = 789 #「加密」認證

[https]
type = https

[http]
type = http

#賦予「授權」
chmod +x frps frps.ini

#背景執行
nohup /opt/frp_0.17.0_linux_amd64/frps -c /opt/frp_0.17.0_linux_amd64/frps.ini &

#檢查「Log」
cat /opt/frp_0.17.0_linux_amd64/nohup.out

#檢查「端口」狀態
netstat -ltunp

3. 配置「frpc」客戶端

=== frpc ( Client ) ===

#切換「/opt」目錄
cd /opt

#下載「frp_0.17.0_linux_amd64.tar.gz」
wget https://github.com/fatedier/frp/releases/download/v0.17.0/frp_0.17.0_linux_amd64.tar.gz

#解壓縮「frp_0.17.0_linux_amd64.tar.gz」
tar -zxvf frp_0.17.0_linux_amd64.tar.gz

#切換「/opt/frp_0.17.0_linux_amd64」目錄
cd /opt/frp_0.17.0_linux_amd64

#刪除「服務器端」文件
rm -f frps frps_full.ini frps.ini

#編輯「客戶端」檔案 (frpc.ini)
vi /opt/frp_0.17.0_linux_amd64/frpc.ini

[common]
server_addr = 219.76.152.250 #指向「服務器端」IP
server_port = 7000 #服務器「監聽端口」
privilege_token = 789 # 驗證「密碼」

[http_01] #自訂「標籤」不能重複
type = http #建立「協議」
local_ip=192.168.3.251  #內網「主機」
local_port = 80 #內網「端口」
custom_domains=zabbix.contoso.com #自訂「二級」域名

#「實現」端口轉發 範例
[forwarding_01]
type = tcp
local_ip=192.168.3.250
local_port = 3389
remote_port = 5000

#背景執行

nohup /opt/frp_0.17.0_linux_amd64/frpc -c /opt/frp_0.17.0_linux_amd64/frpc.ini &

#檢查「Log」

cat /opt/frp_0.17.0_linux_amd64/nohup.out

接著透過「瀏覽器」輸入「http://zabbix.contoso.com」即可完成 Frp 內網穿透,有興趣朋友可以接著研究「frp xtcp」可以完成「P2P」點對點傳輸,大幅節省 vps 主機 頻寬流量限額 。


參考資料
「http://github.com」-「frp」
「www.dkys.org」-「frp内网穿透中文文档」
「不曾長大 Blog」-「利用frp实现外网访问内网」
「segmentfault.com」-「如何用 Frp 实现外网访问群晖 NAS」

2018年4月29日 星期日

S小魚仔S Tencent (騰訊雲) VPS 設定 SSH KEY

騰訊雲 (國際版) 提供 海外註冊 前三個月 每月反饋 50 美金 共 150 美金,果斷註冊來玩一下,如何註冊不是本文重點,自己想辦法。

使用「Tencent」建立「SSH KEY」請使用「Puttygen」工具 ( 建立 Public Key 和 Private Key )

1. 選擇「RSA」加密
2. 點選「Generate」
3. 產生「Publick Key」(複製下來)

進入「騰訊雲 (國際版)」網頁

必須 關閉「VPS」主機,才能做「Publick Key」加密 

1. 點選「SSH KEY」
2. 點選「Create a key」

1. 選擇「Use an existing public key」
2. 輸入 「名稱」
3. 貼上「public key」

選擇「SSH KEY Name」綁定「VPS」主機


以上「VPS」掛載「Publick Key」完成,接下來「匯出」( Private key )


匯出「Private key」使用「putty」或「遠端工具」載入即可