
「LXD」是系統容器管理器。它提供了類似於虛擬機的用戶體驗,但使用的是 Linux 容器,它是基於圖像的,預製作的圖像可用於大量的 Linux 發行版,構建在一個非常強大但非常簡單的 REST API 上,LXD 項目由「Canonical」有限公司創建。
~~~ 前置作業環境準備 ~~~
#修改「主機名」
hostnamectl set-hostname lxd
#關閉「Selinux」為「disabled」
sed -i 's/SELINUX=enforcing/SELINUX=disabled/' /etc/selinux/config
#安裝「copr」
yum install yum-plugin-copr -y
yum copr enable ngompa/snapcore-el7 -y
#啟用「LXD」容器需要參數調整
grubby --args="user_namespace.enable=1" --update-kernel="$(grubby --default-kernel)"
grubby --args="namespace.unpriv_enable=1" --update-kernel="$(grubby --default-kernel)"
sh -c 'echo "user.max_user_namespaces=3883" > /etc/sysctl.d/99-userns.conf'
#重開機
reboot -h now
1. 安裝「snap」
#安裝「epel-release」源碼
yum install epel-release -y
#安裝「snapd」
yum install snapd -y
#開機「啟用」snapd 服務
systemctl enable --now snapd.socket
#註冊「snapd」
ln -s /var/lib/snapd/snap /snap
#編輯「環境」變量
vi ~/.bash_profile
vi ~/.bash_profile
PATH=$PATH:/snap/bin
#更新「環境」變量
source /etc/profile
#檢查「snap」安裝「版本」
snap version

2. 安裝「LXD」
2. 安裝「LXD」
snap install lxd

#檢查「snap」安裝「套件」
snap list

#設定「lxd」初始化配置
lxd init --auto
預設 會啟用「lxdbr0」NAT 虛擬網路並派發「DHCP 」
#關閉「lxd」ipv6
lxc network set lxdbr0 ipv6.address none
#查詢「lxd」lxdbr0 網段 (NAT)
lxc network get lxdbr0 ipv4.address

我習慣 額外配置「LXD」Bridge「Host」網卡,好讓外部「環境」存取
#安裝「Bridge」工具
yum install bridge-utils -y
#關閉「NetworkManager」因不支持「Bridge」
chkconfig NetworkManager off
chkconfig network on
service NetworkManager stop
service network start
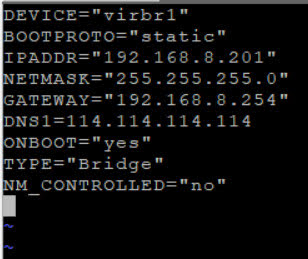
#建立「virbr1」虛擬網卡 ( Bridge ) Mode,取代原本「實體網卡」IP 位址
vi /etc/sysconfig/network-scripts/ifcfg-virbr1
DEVICE="virbr1"
BOOTPROTO="static"
IPADDR="192.168.8.201"
NETMASK="255.255.255.0"
GATEWAY="192.168.8.254"
DNS1=114.114.114.114
ONBOOT="yes"
TYPE="Bridge"
NM_CONTROLLED="no"
#編輯「ens33」實體網卡=>橋接「virbr1」
vi /etc/sysconfig/network-scripts/ifcfg-ens33
DEVICE=ens33
TYPE=Ethernet
BOOTPROTO=none
ONBOOT=yes
NM_CONTROLLED=no
BRIDGE=virbr1
service network restart
#輸入「ifconfig」確認配置

#確認「LXD」支持「Network」
lxc network list

#建立「LXD」Network Profile
lxc profile create virbr1_profile
#編輯「virbe1_profile」 (注意縮排)
lxc profile edit virbr1_profile
config: {}
description: ""
devices:
eth0:
name: eth0
nictype: bridged
parent: virbr1
type: nic
name: virbr1_profile
used_by:

#建立「LXD」容器 並套用「Network Profile」
lxc launch -p default -p virbr1_profile ubuntu:xenial ct01

# 檢查「LXD」容器 獲取「IP」位址
lxc list

~~~ 「LXD」相關指令 ~~
lxc list
#檢查「lxd」設定檔
lxc profile list
#檢查「lxd」網路連接方式
lxc network list
#檢查「容器」存放「位置」
lxc storage list
#查詢「鏡像」過濾「centos」
lxc image list images: | grep -i centos
#查詢「鏡像」過濾「ubuntu」
lxc image list images: | grep -u ubuntu
#檢查「遠程」映像
sudo lxc remote list
#檢查「本地」映像
lxc image list
參考資料
「www.linuxprobe.com」-「LXD 和 Juju 佈署應用」